The making of Busy StatusBar

I am tired of being constantly distracted by colleagues who don't let me concentrate on my tasks. I used the Pomodoro technique to stay focused, however, the technique becomes useless if my colleagues are unaware I am in focus mode. I tried to find a tool to let everyone around me know that I'm concentrating and would be available to chat in 20 minutes. At the same time, I didn't want to look like the person everyone should avoid. Unfortunately, I didn't find such a tool.
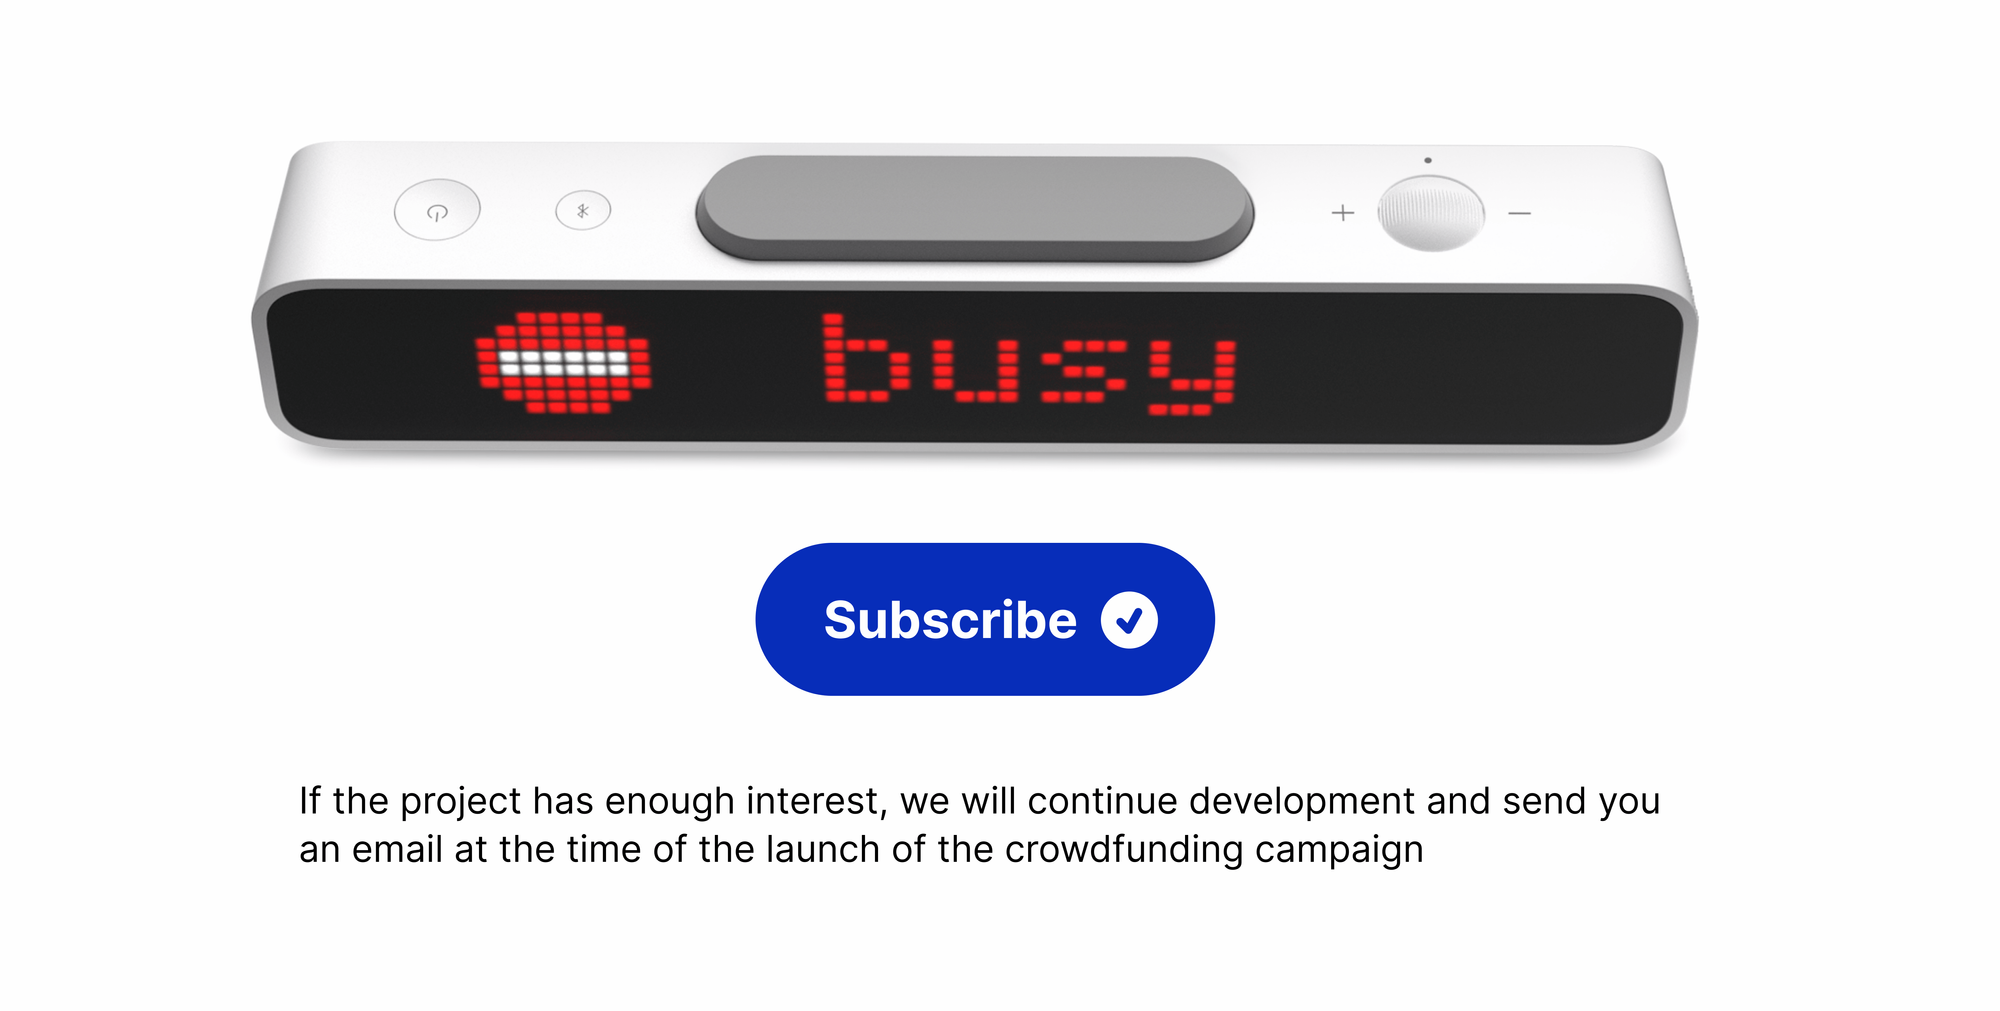
So I decided to design a status bar that would replace a pomodoro kitchen timer and, at the same time, show others that I am busy and when I will be available. It was essential to make the status bar usage as straightforward as possible. I need only one second to press the button to light up the BUSY status with a countdown. I plan to make the firmware and API completely open source so everyone can add their integrations to the device, such as plugins for time trackers.
In this article, you will see the current prototype of the status bar based on the ESP32 microprocessor. I will describe way how our team worked on the design and ergonomics of the device, and designed hardware.
Please share your feedback on the project.
It is hard to concentrate in open space
I use the Pomodoro technique and work in short 25-minute sprints. I set a timer to focus on the current task, and then I take a 5-minute break. This simple technique works for me and helps me to be as efficient as possible.
For me, being in open space has its drawbacks, such as difficulties with focusing on tasks. I was constantly distracted by questions and chats. Eventually, the whole concept behind the Pomodoro Technique turned out to be useless for me.
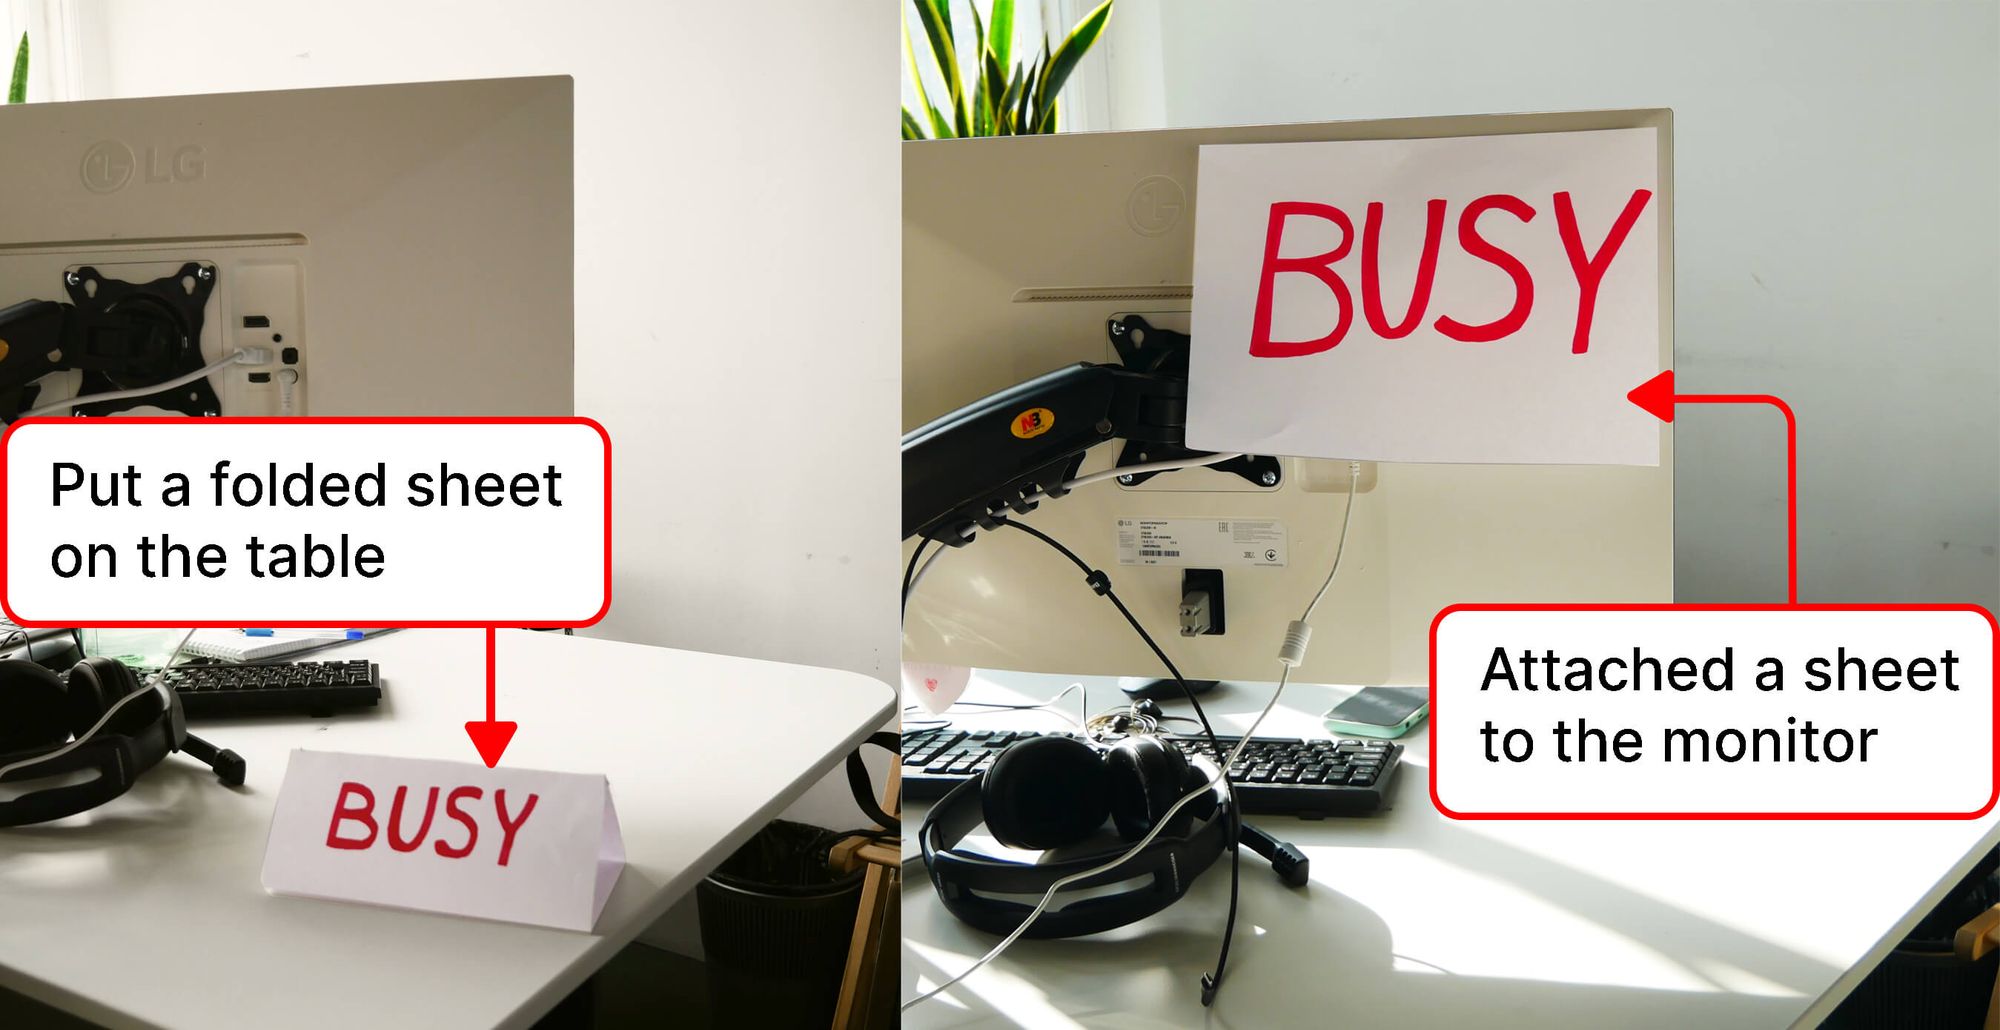
I put a paper sign on the table that said "BUSY". Many did not notice and ignored it, then I began to stick a large sheet of paper to the back of the monitor, and it worked better. But then, in addition to setting the kitchen timer, I had to hang a sheet with my status, and when the timer expires, do not forget to take it off.
Then I decided to make a glowing sign. The idea was that a large and bright text is activated and lit up by a button, while it does not have to be put up and removed like a piece of paper. And most importantly, you can activate it in a second, unlike attaching a sign to the monitor.
To be fair, conceptually similar lamps are already on sale. But all the desktop ones that I found light in all directions and are annoying. Also, these are some huge LED displays that need to be hung on the wall. If you know of good options, please share them with us.
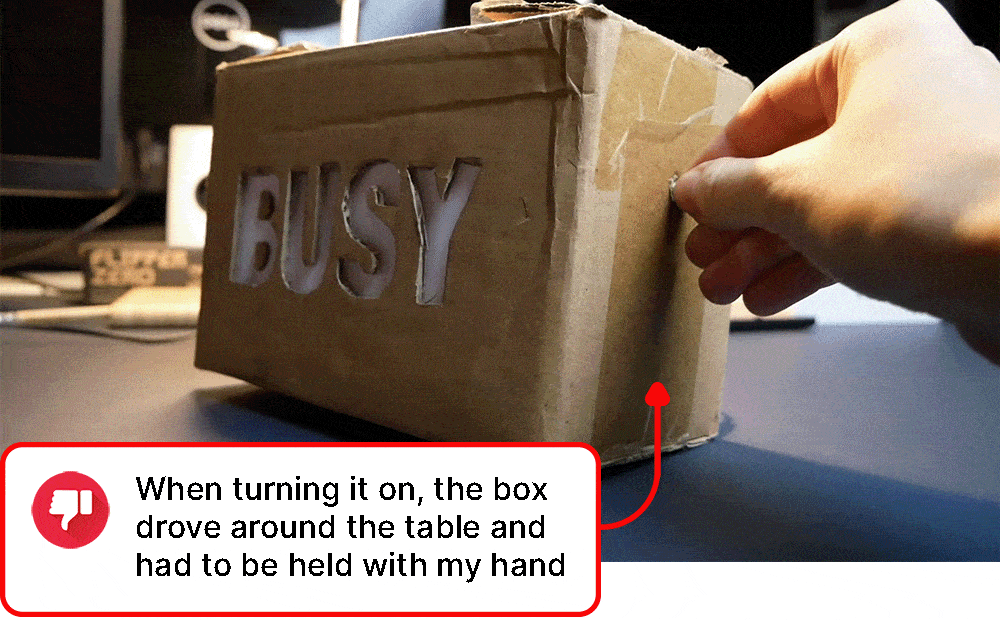
The first prototype made of cardboard and diode tape
Instead of a sheet of paper, I assembled a lamp out of a cardboard box with an LED strip inside and a toggle switch. Experimentally, I tried to choose the size and brightness of the text so that a person could see the sign even at a distance when approaching my table.
The cardboard box did its job, but it turned out to be inconvenient: when turning it on, the box drove around the table and had to be held with my hand. To solve this problem, I also considered adding a button pressed from above. But due to the height of the box, it constantly fell over if the table was pushed. Obviously, it was necessary to either increase the weight or reduce the height.
When will you be available?
It turned out that just a text with my status is not enough. If something is urgent, people still broke through the sign and asked “When will you be available?”.
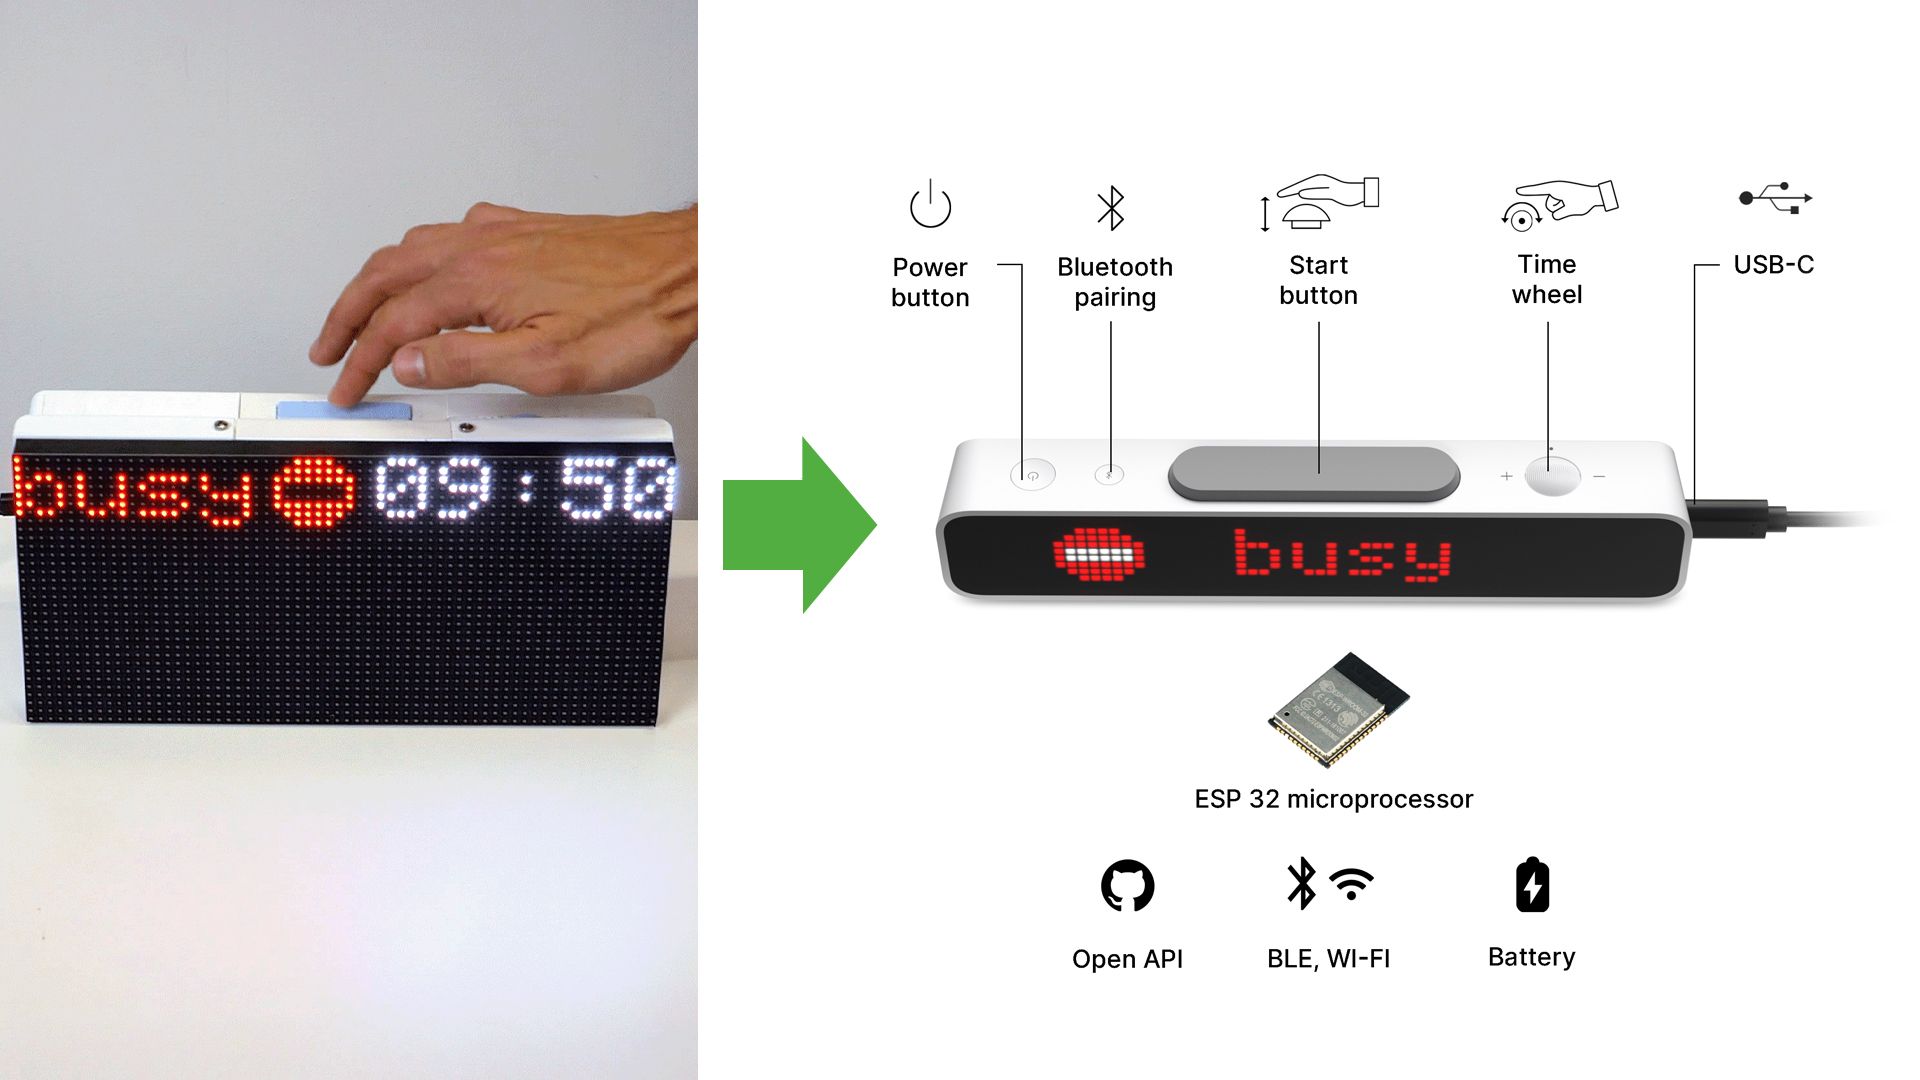
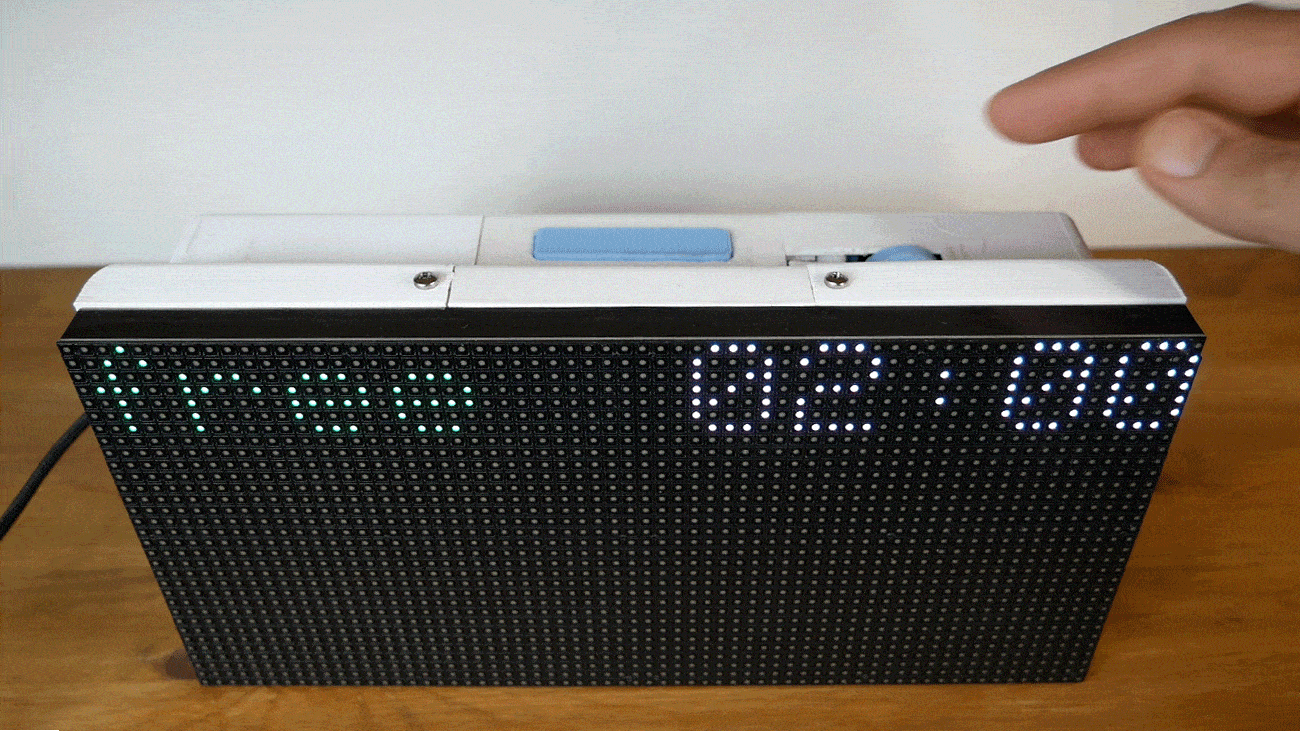
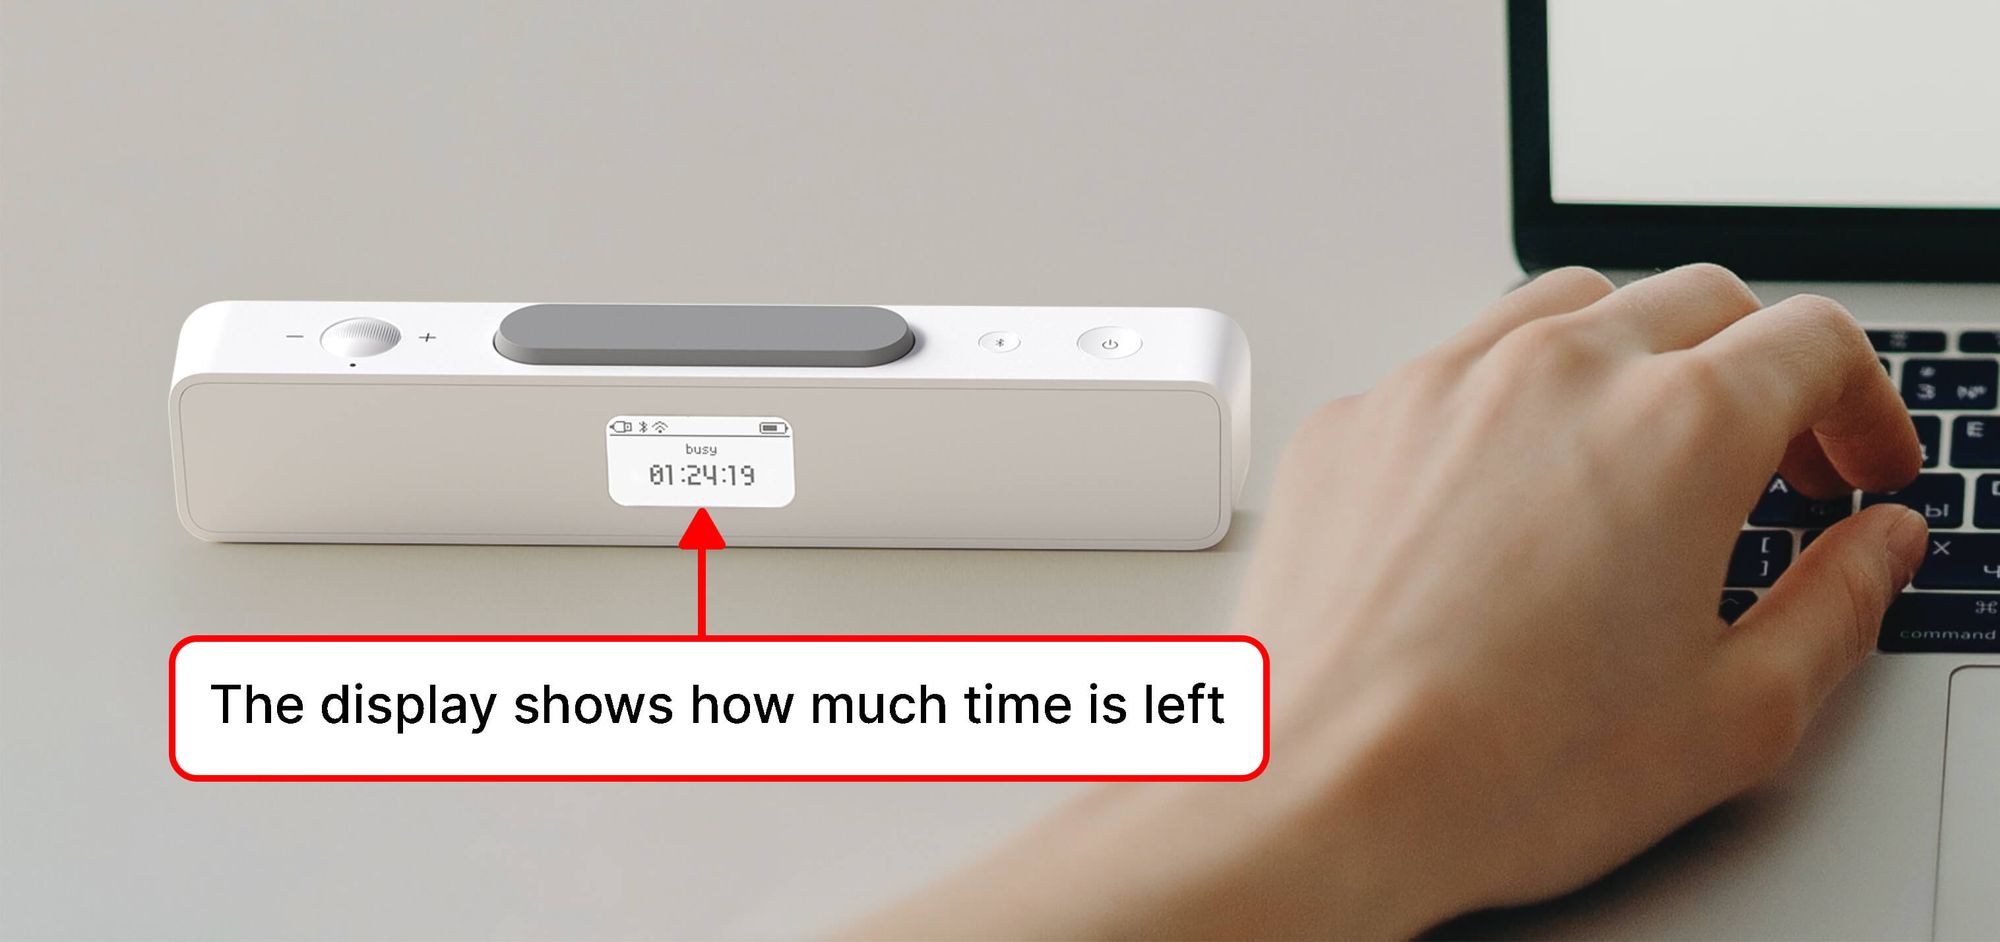
It became clear that only text about my status wasn't enough, so I decided to build a new prototype with a display and practical casing. The display would show my “BUSY” status and the remaining time for this status. The new casing would solve problems with stability and strength.
The second prototype with a display and timer
So that people would not ask “when will you be available?” I had to explain how much longer I would be busy. I decided to use a display indicating the remaining time and the “BUSY” status. For that, I used a diode matrix. The matrix size was too big, but only this one was in stock. Based on it, I designed a casing and printed it on a 3D printer.
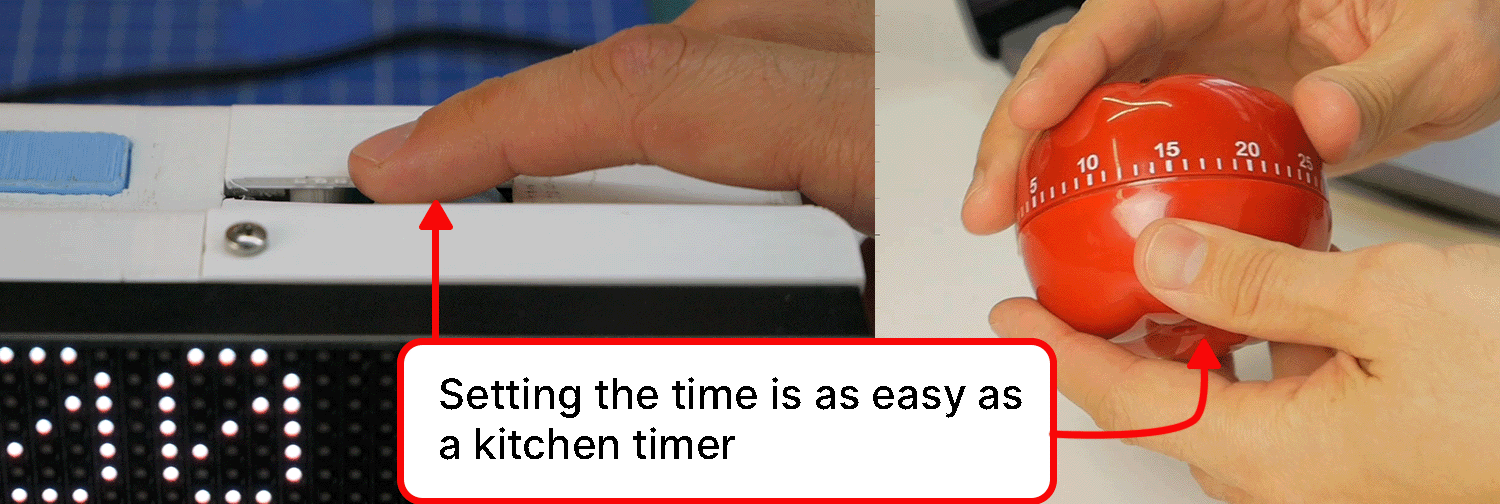
The device is activated in two steps. First, the wheel sets the time interval. Second, the start button initiates the countdown and displays the status. If you press the start button while the timer is running, it will stop the countdown. The previous time interval is saved, so if you press the start button, the last interval time will be displayed.
I wanted a mechanical encoder (a wheel) to set the time because, in my opinion, the buttons are not so satisfying to press. Sometimes I change the interval time and want to keep the same tactile feel as a kitchen timer.
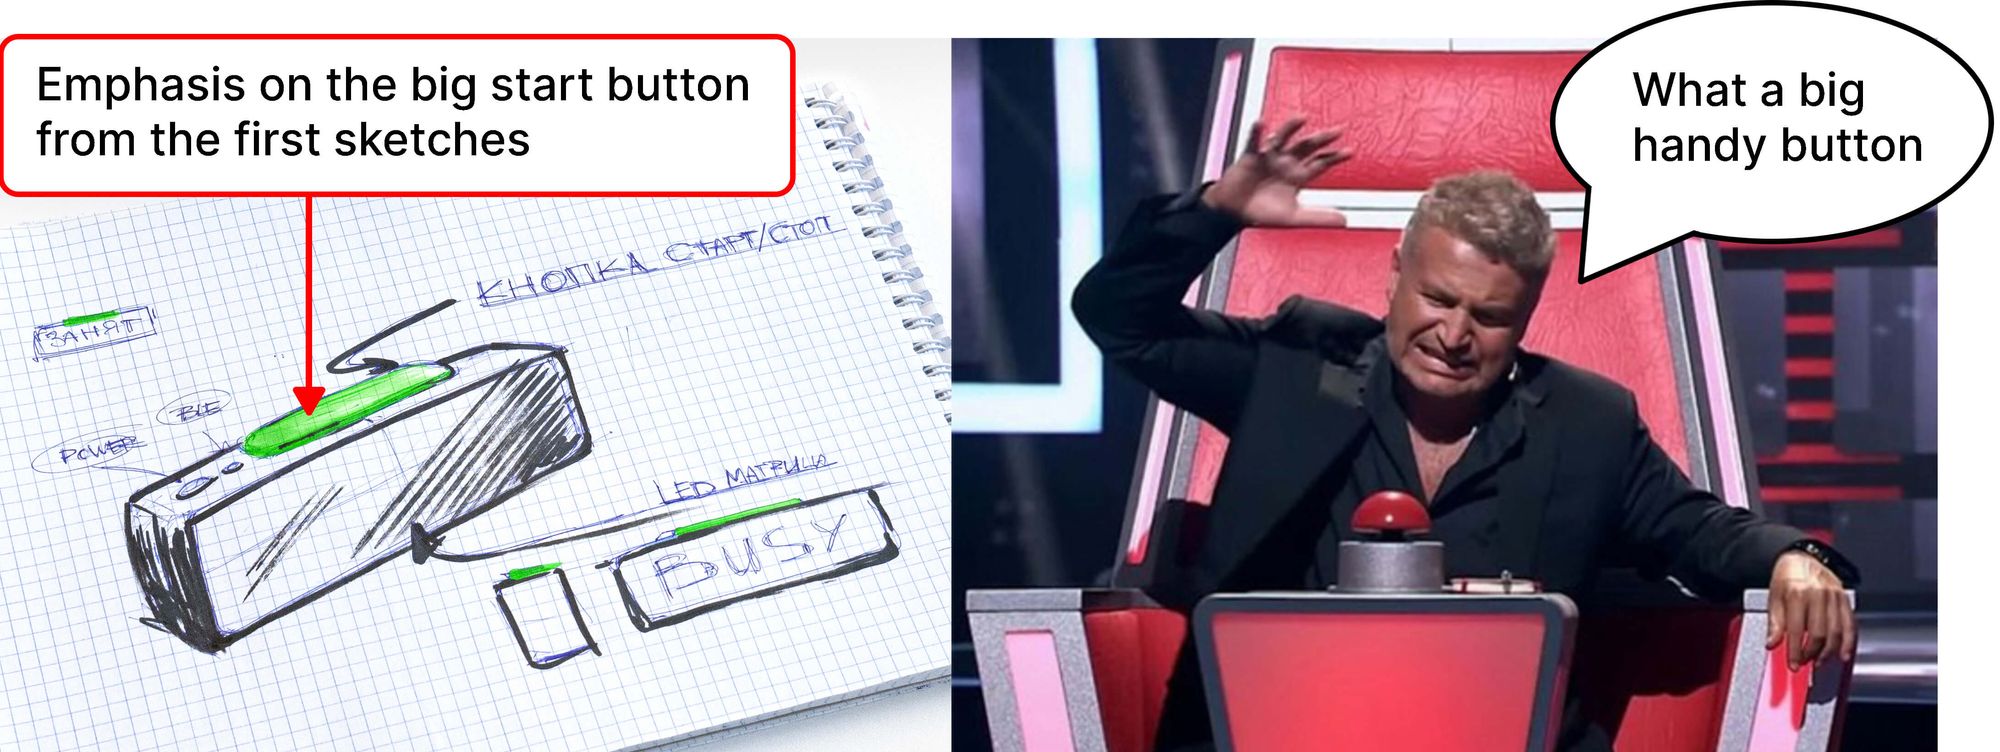
The start button has been moved to the top for convenience and stability. Due to its position, you can press it without looking, like hitting a button on a chess clock. This design was handier than any side buttons, toggle switches, or cable switches.
I think the big button on top is an excellent idea. I have not seen this in other similar products. In other products, you need to press a button on the side or, if a button is on top, hold the device so that it does not fall and aim at the small button to press it.
This prototype did its job, but there were drawbacks:
- Low pixel density, hard to read.
- Poor visibility when sunlit.
- It takes up a lot of table space.
- Bad-looking (joints and screws stood out).
- Need for an outlet.
Making it small and pretty
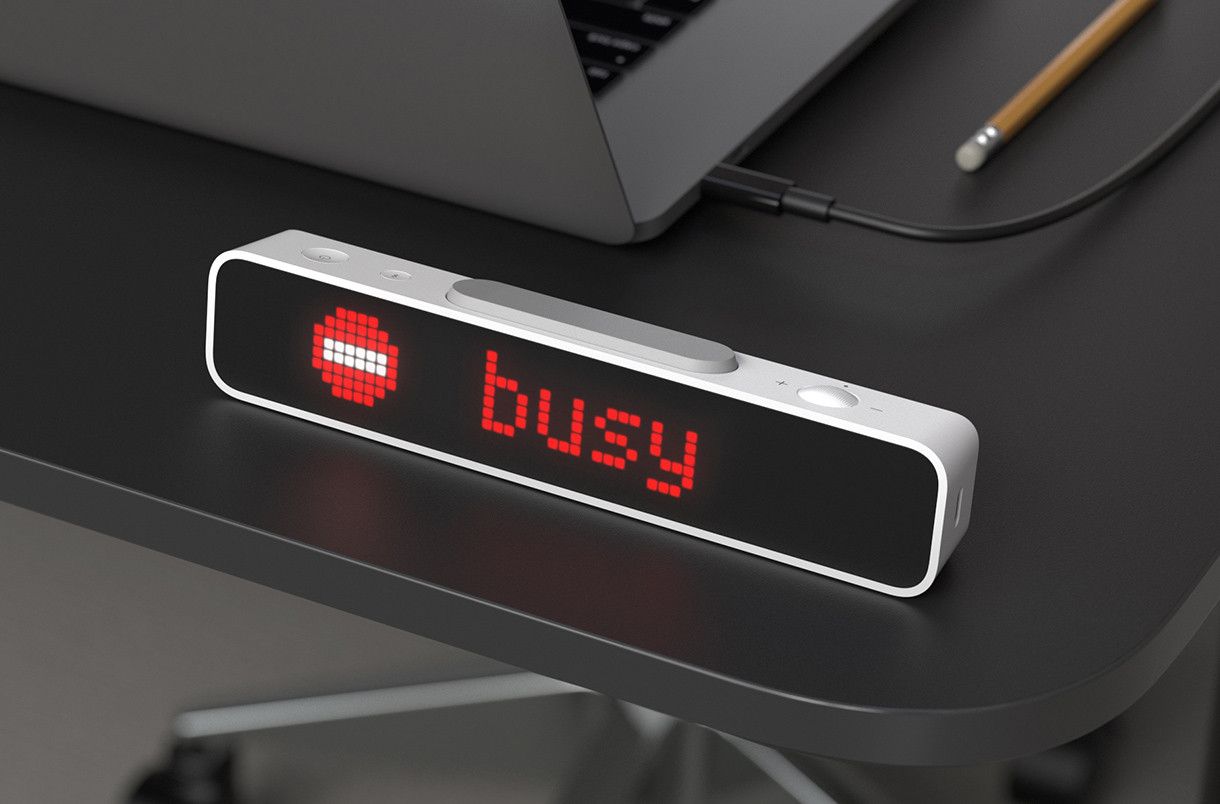
After creating the prototype with a display, the design direction and ergonomics were clear. I decided to focus on design and finding the form with the team. In the new status bar design, the primary emphasis is made on the start button and its form.
The status bar size was reduced to one line, which is enough to display the status and remaining time (pixel font 8x64 pixels). We did not find a ready-made matrix, so we decided to make our own. Due to the compact size, we wanted to be able to move the status bar from the outlet, for example, hang it on the door and activate the message DO NOT ENTER, so we decided to add a battery.
We are still experimenting with the size and shape of the status bar. The first prototypes were smaller and thinner because they did not consider the electronics and the battery. The size of the newer variants is based on the electronics requirements and overall stability on flat surfaces.
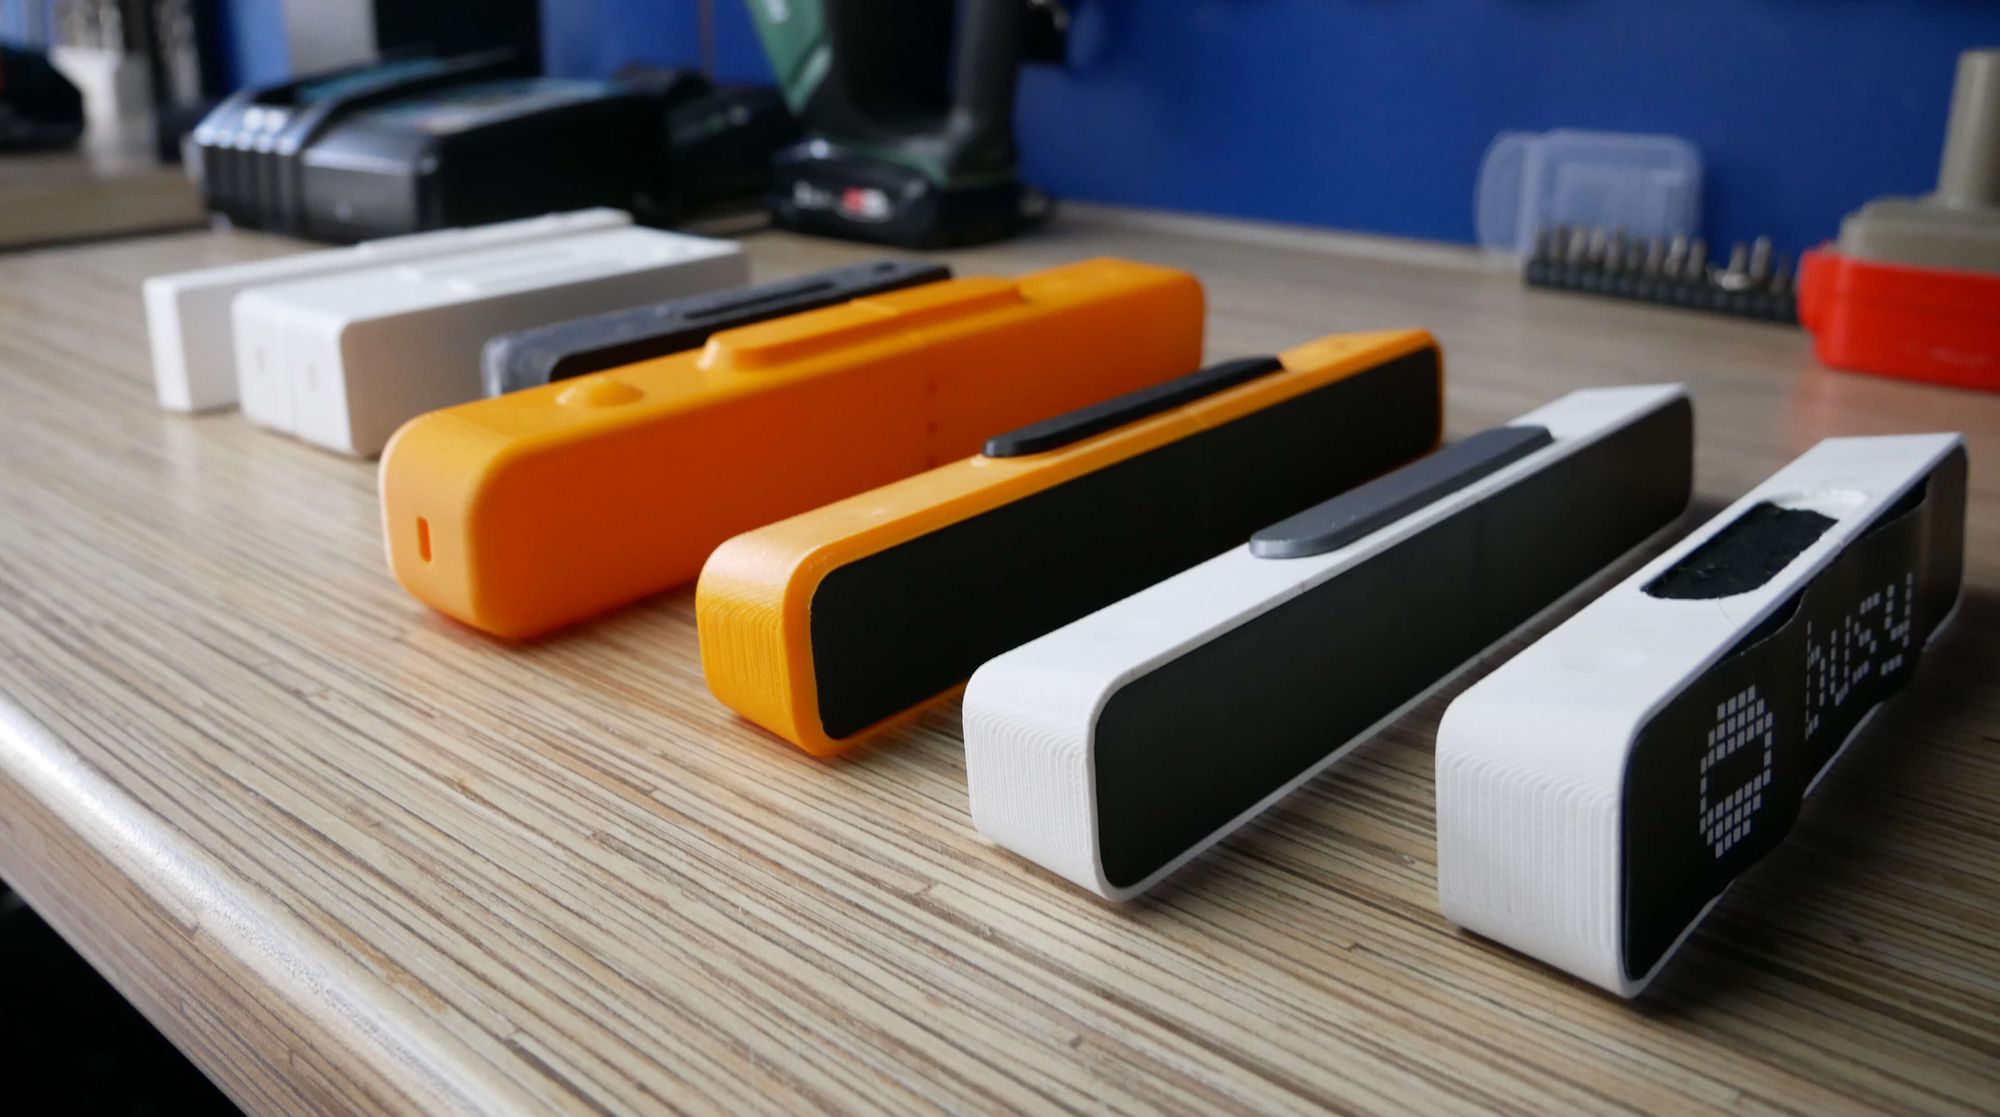
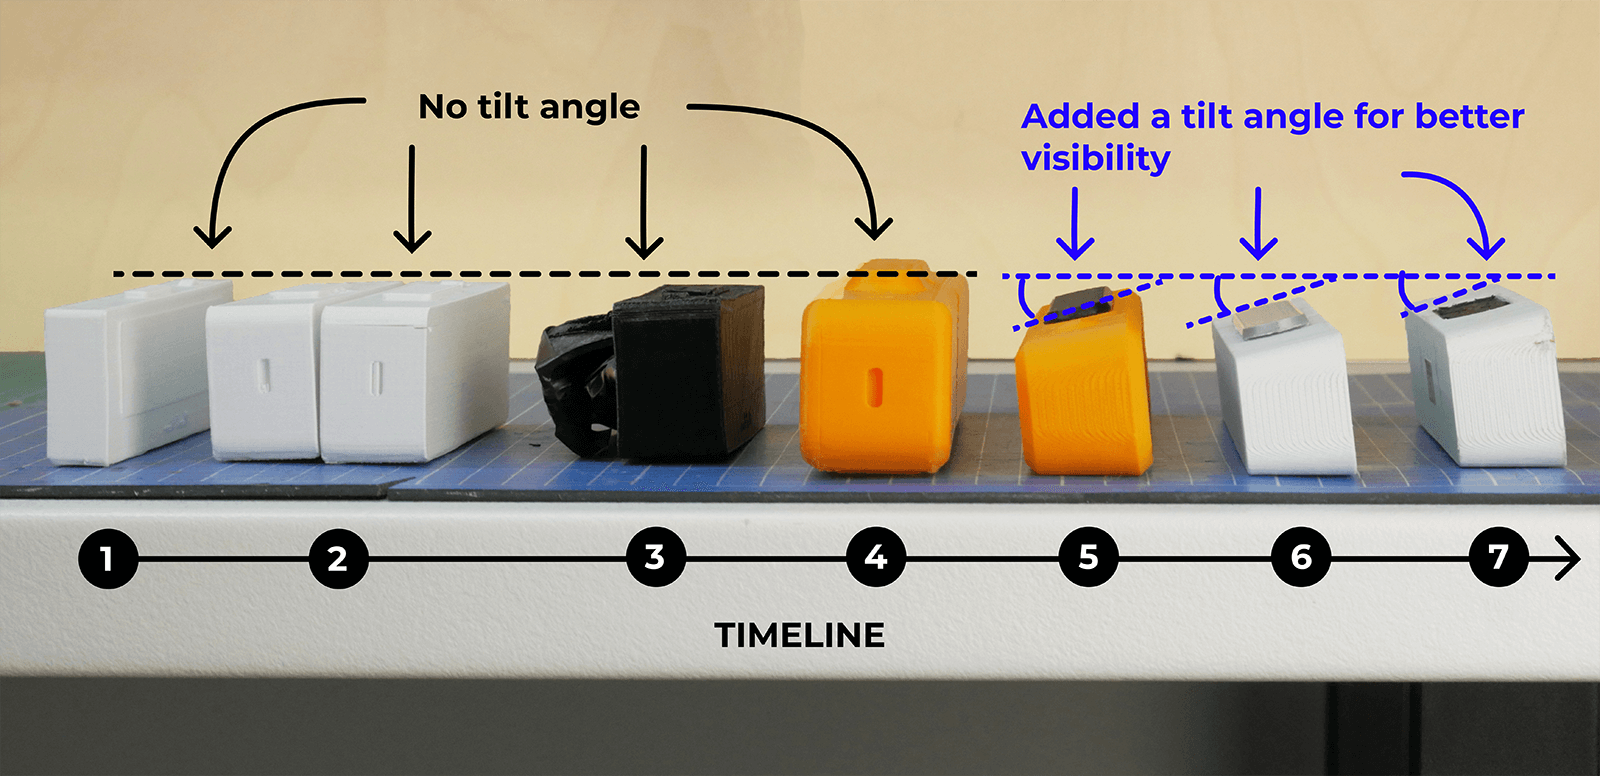
So far, we have made seven iterations, finalizing the shortcomings after each version: changing the dimensions, chamfers, and tilt angles. In the latest versions, the display is tilted so that a person standing next to the table can better see the displayed status.
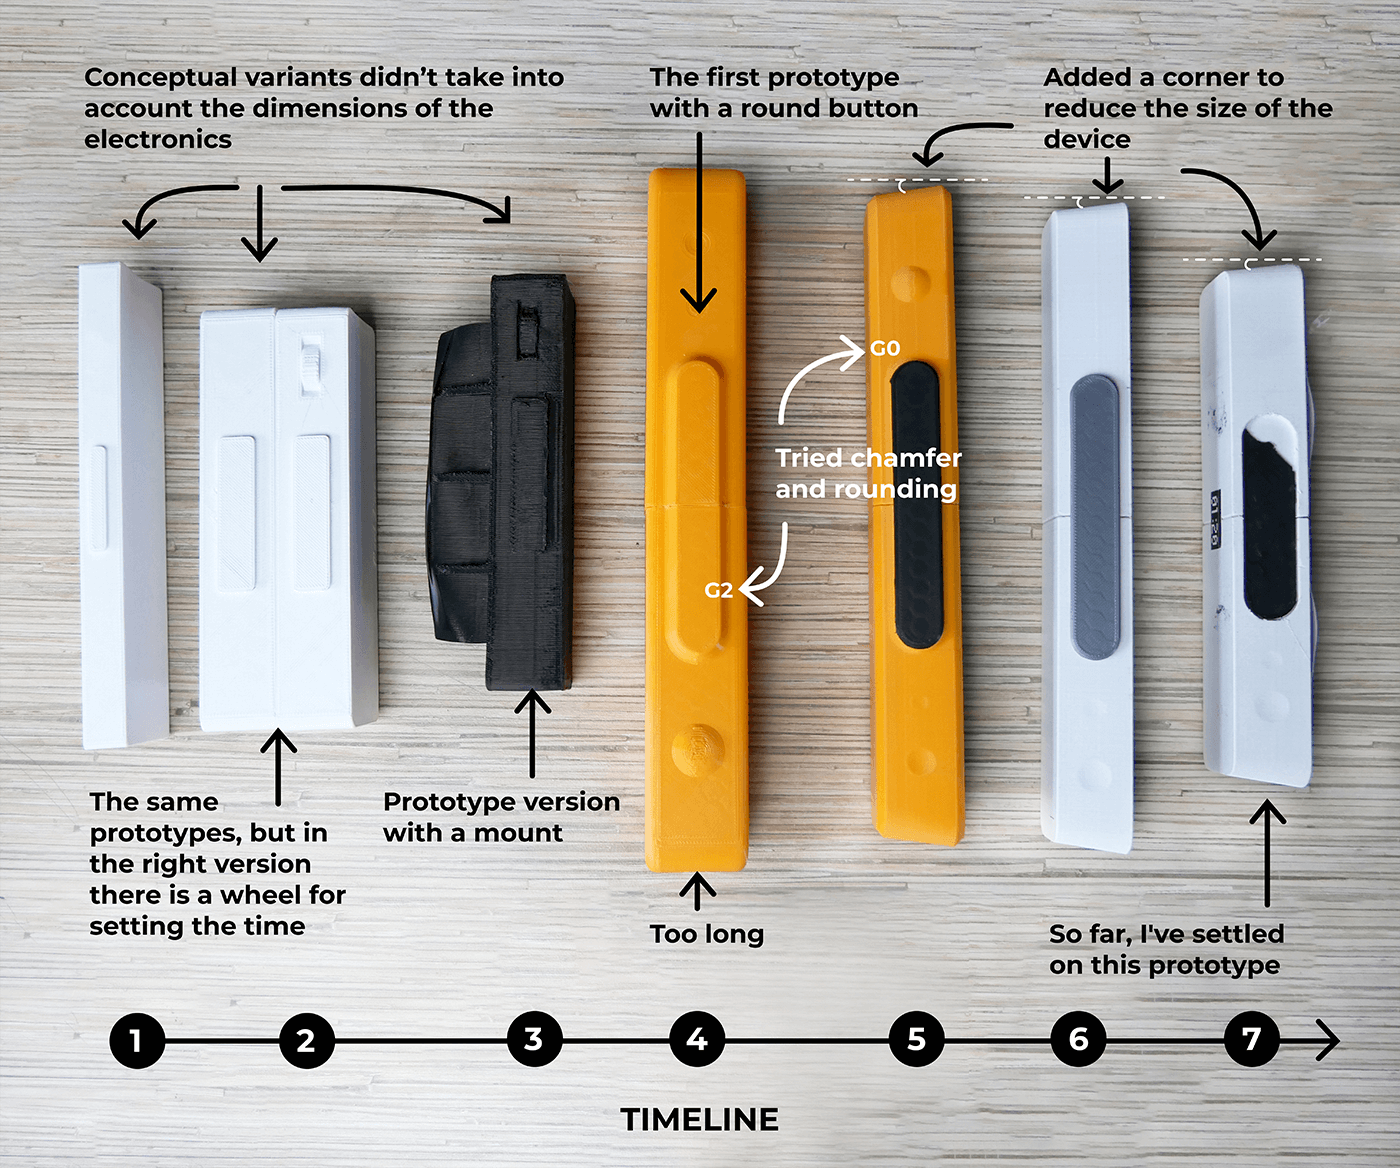
Initially, there were ideas of making holes at the back of the status bar so we could mount it on a wall or door. But this idea was rejected because we needed a more straightforward way to mount the device. Now we have an idea of easily attaching and removing the status bar on vertical surfaces using a magnetic mount.
The status bar form has been finalized. It is a white rectangle with a tinted plastic front panel that covers LEDs. As for the location of the USB port, there is no certainty yet. It seems correct to place it on the side, but it is not very handy when the device is mounted on a monitor. What do you think?
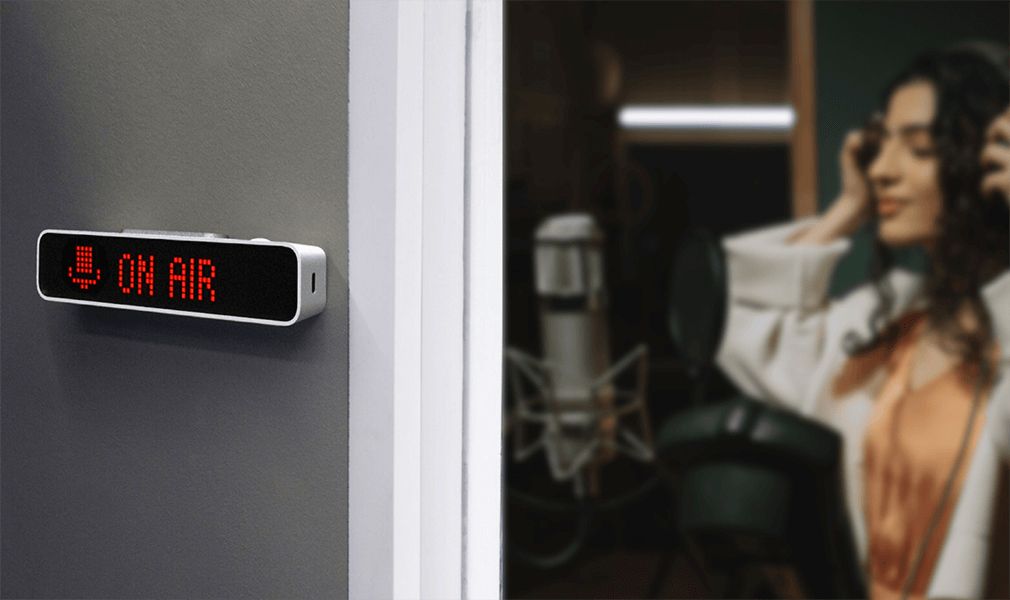
Mounting on vertical surfaces
Sometimes I record sound in my room and don't like it when my family members knock or open the door. To let my family know that I am busy, I wanted to be able to attach the status bar to the door of my home studio. To do that, I plan to install neodymium magnets inside the status bar casing and add a thin metal plate on double-sided foam tape to the kit. Once I glue the plate on the door, I can easily mount and remove the device.
The status bar installed on the door will require periodic charging. For simple charging, removing and putting it back easily is vital. Therefore, using magnets and a metal plate to mount the status bar seems the best option.
Display on the back
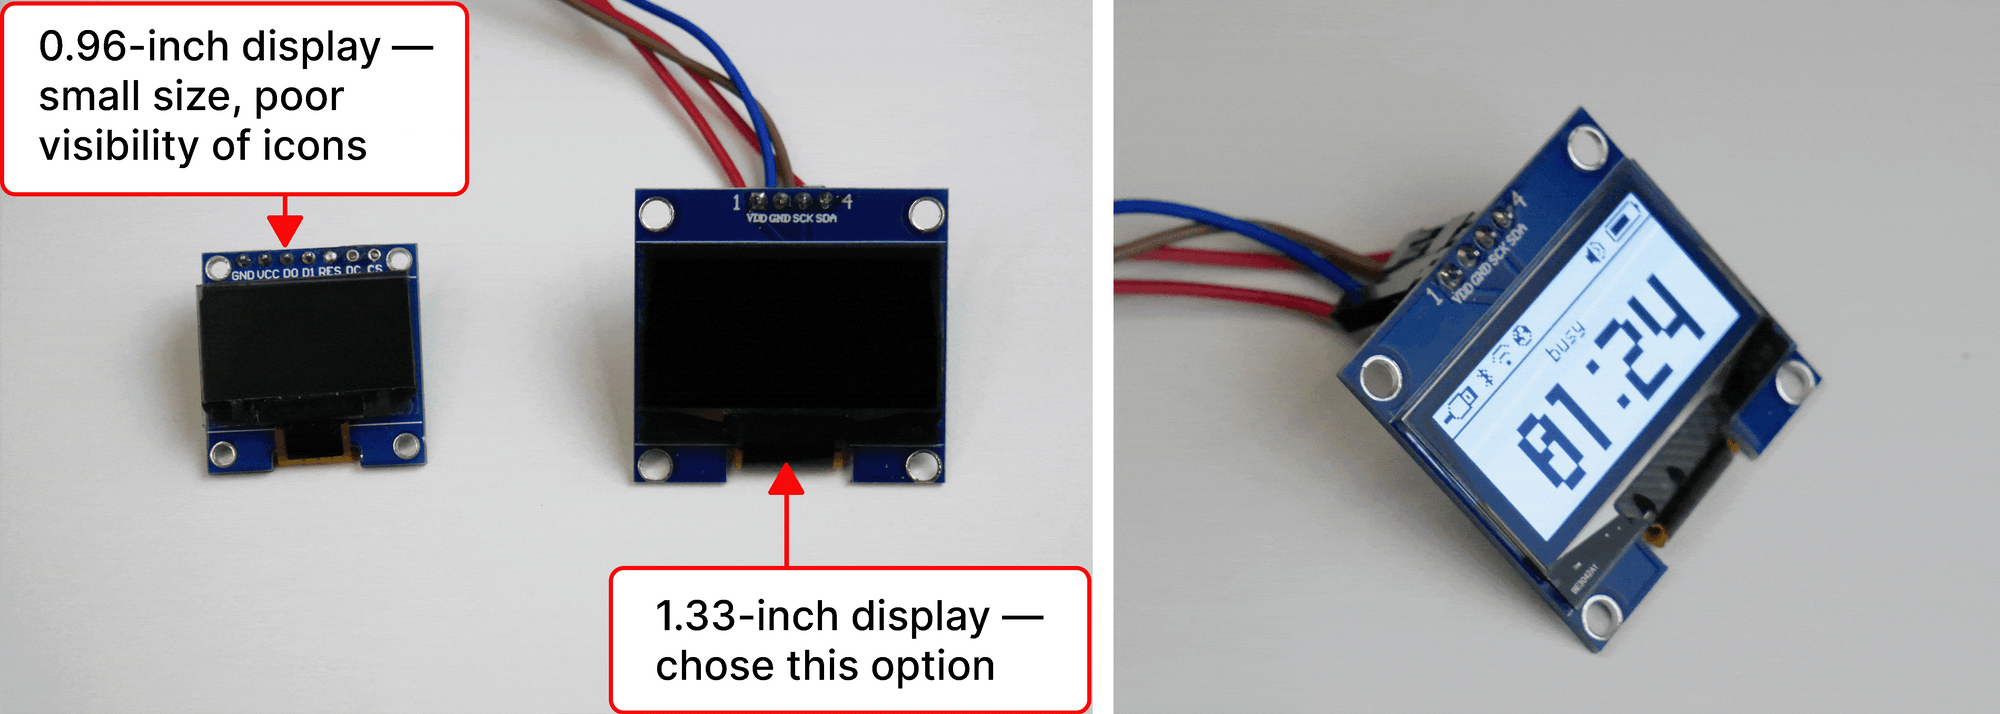
While working on the first prototype, it became clear that it was impossible to determine how much time was left until the timer's end. It was required to turn the device to see the remaining time on the front display. With a kitchen timer, it is easier - you can quickly see how much time left for work or rest. Therefore, we decided to add a small OLED or LCD on the back to indicate the remaining time and battery charge.
Initially, we wanted to use a backlit LCD display, but its contrast at a small size does not provide good visibility, so we settled on an OLED display with an I2C connection. In terms of display size, we chose between 0.96-inch and 1.33-inch options. The 1.33-inch variant has better visibility and more readable icons, so this variant was selected. We understand that an OLED burn-in is possible, but for now, we consider it the best option in terms of contrast. As a solution, an installed light sensor and brightness adjustment will extend the display's life. If you think there are better options, please share them with us.
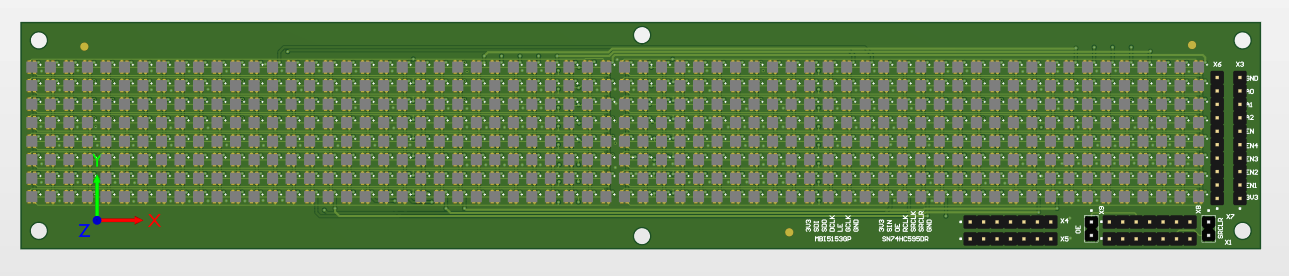
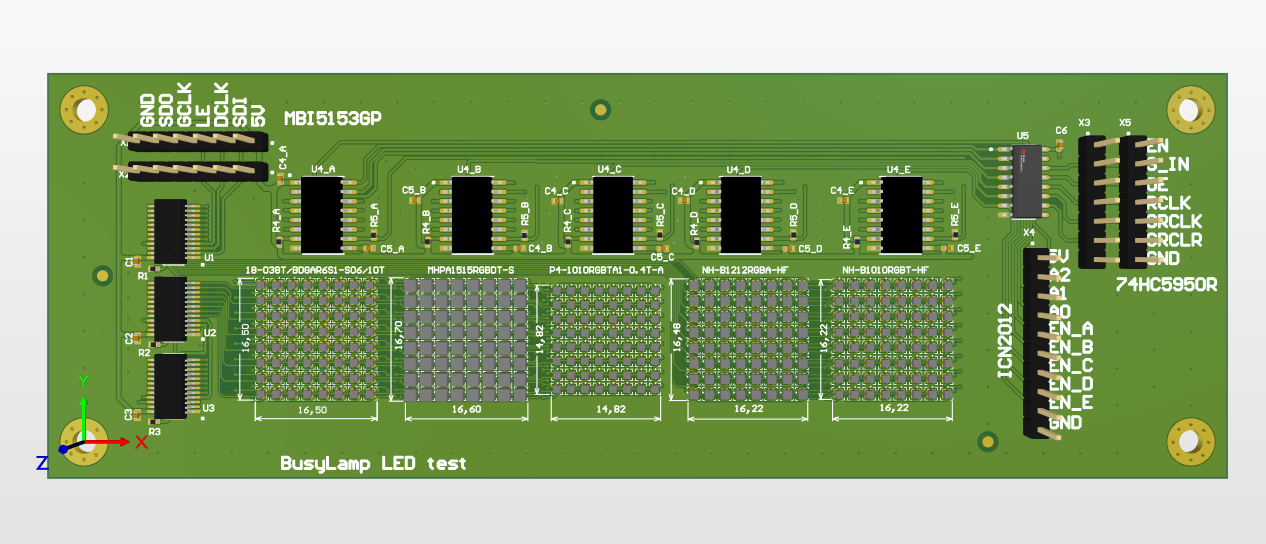
Diode matrix and hardware
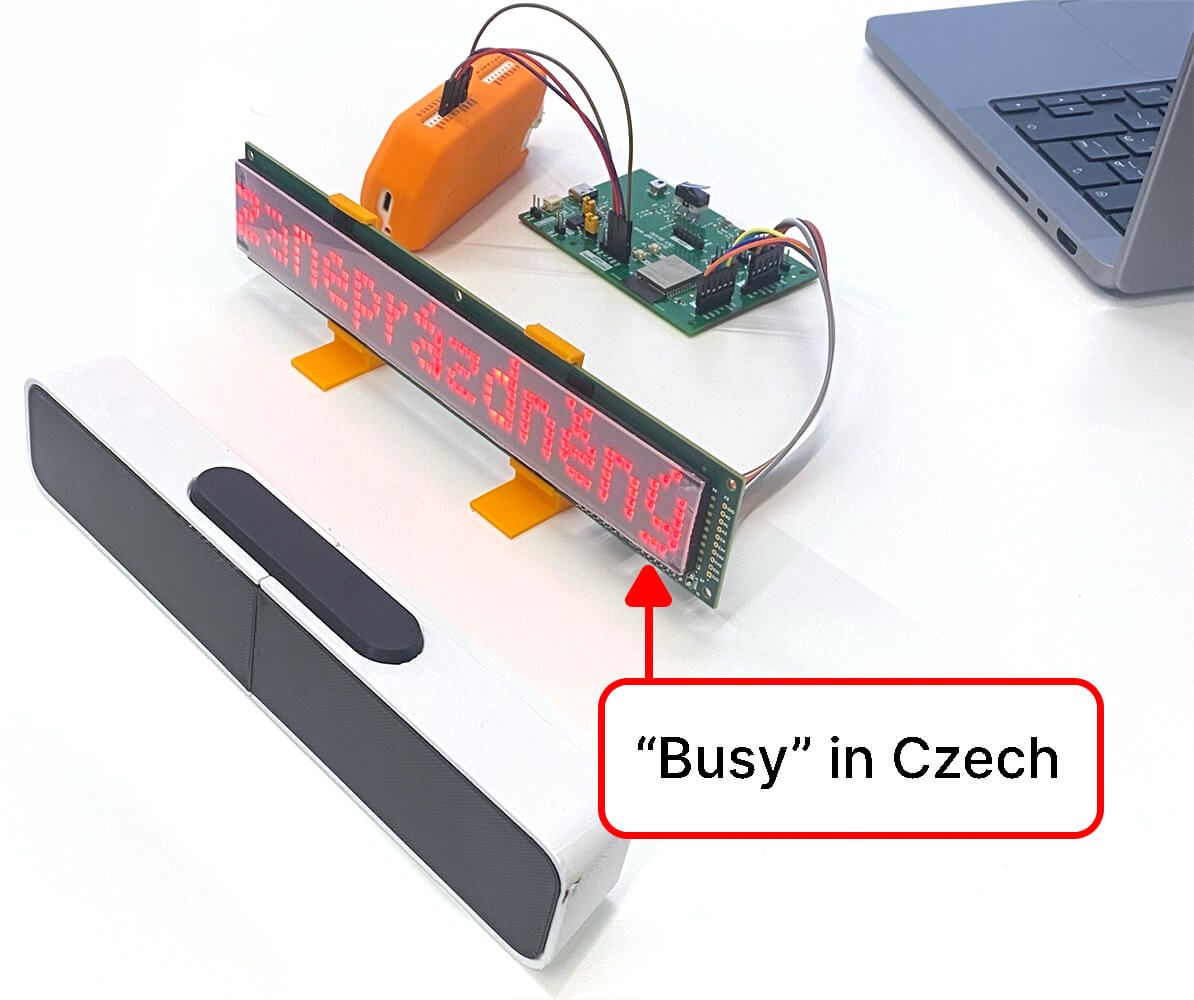
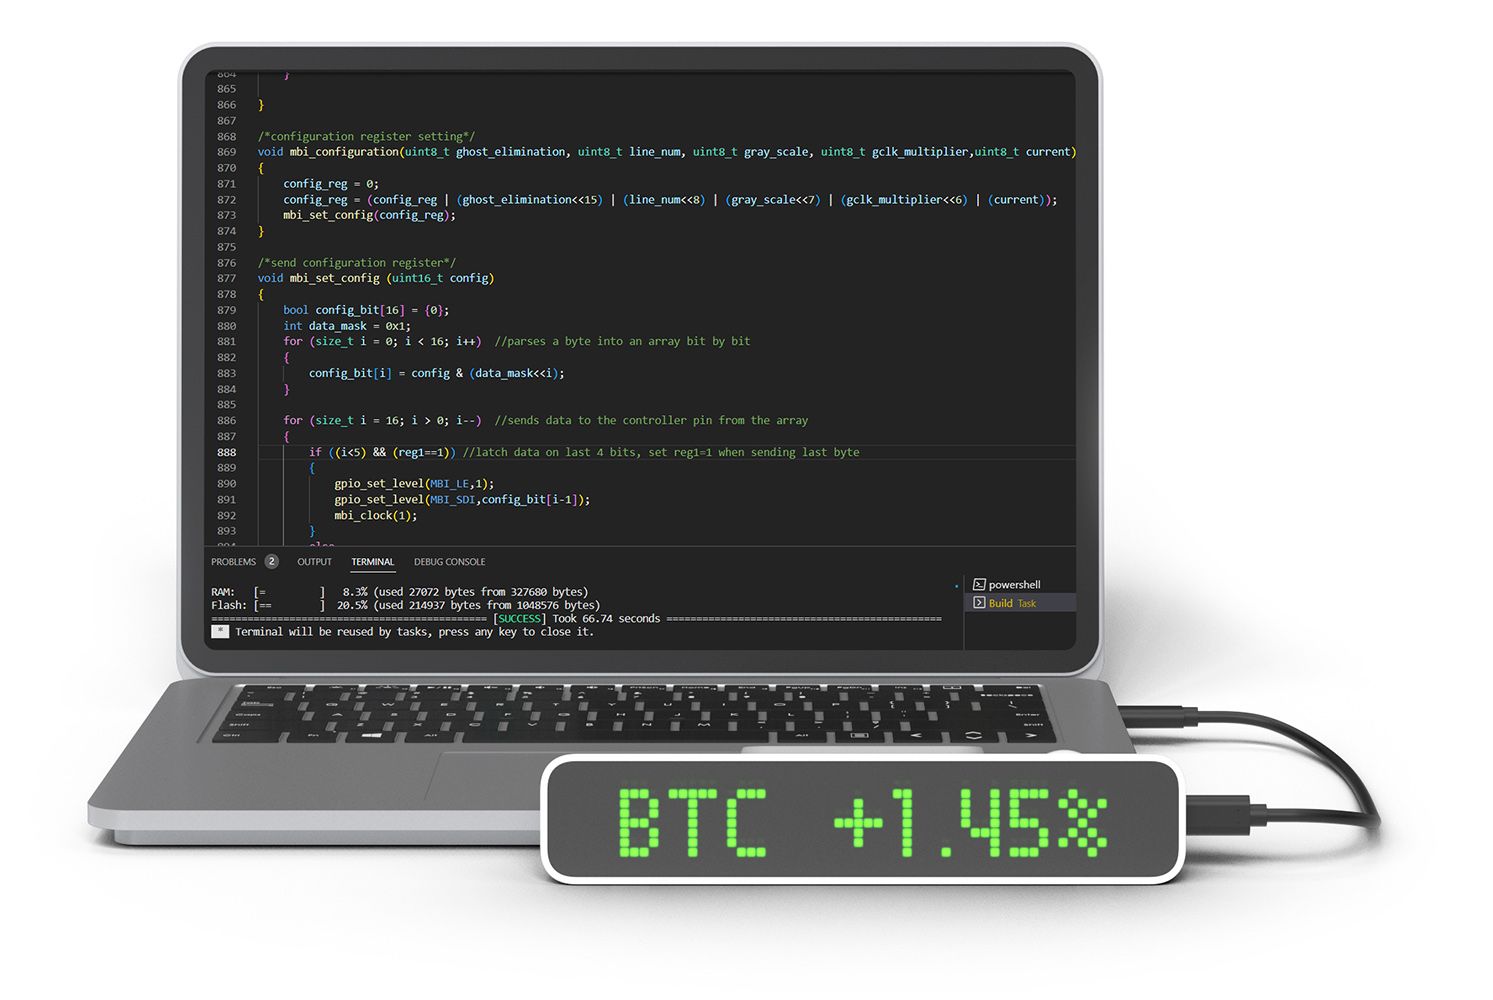
We were choosing a front display from ready-made variants, but no such displays would meet our size, pixel density, or price criteria. Therefore, we decided to make our own matrix on a custom board. To determine the size of the display, we tried to write "Busy" in the world main languages and see if the word fits. For symbols, 8 pixels in height is enough, and 64 pixels in width is the minimum value to fit the word “busy” in Czech - the longest variant among all. At this stage, the front screen matrix 64x8 pixels resolution is chosen.
Here is the first test board with 2.1 x 2.1 mm diodes, with a 1.5 mm distance between diodes. Still, the display size, together with the body, turns out to be too big, which is handy to put the device in a bag.
Now we are considering five different types of diodes with sizes from 1 to 1.6 mm. We plan to make test matrices of 8x8 pixels with different diodes on one board to check the brightness and choose the final version. At the time of writing, these test modules are still in production.
It is expected that such a size of the diodes will increase the resolution to 80x16 pixels so that more information can fit on one screen, and the size of the matrix itself will become smaller. But so far, it is unclear how these super small RGB diodes will look in real life. Perhaps the community will suggest something. What types of small diodes would you recommend?
Block diagram
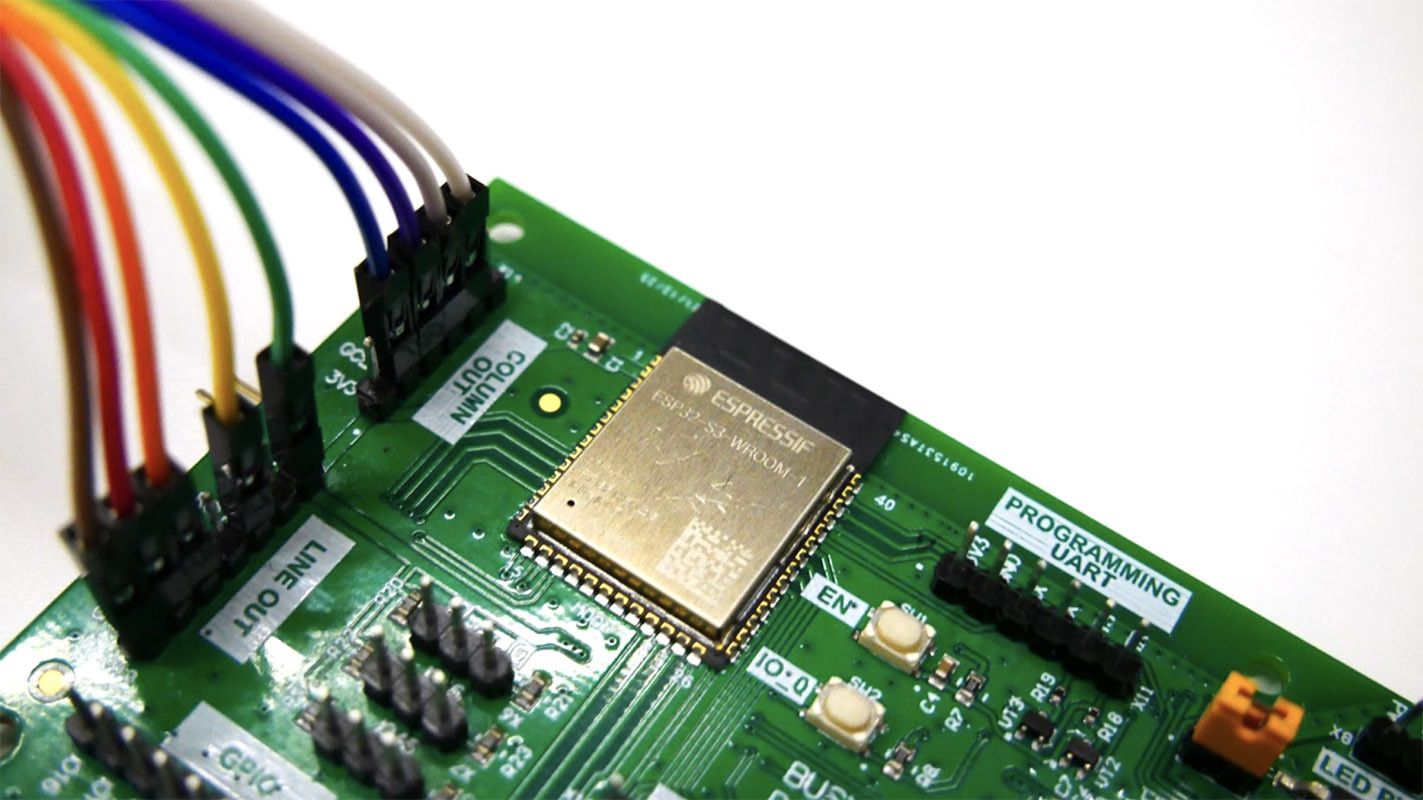
The first prototypes were made on Arduino, but in mass production, it is planned to use the ESP32-S3-WROOM1 microprocessor. This microprocessor has Bluetooth LE and Wi-Fi capabilities, can fall asleep to save energy, has many peripherals, and has a low price tag. Perhaps we will switch to something like NRF, but ESP32 does its job so far.
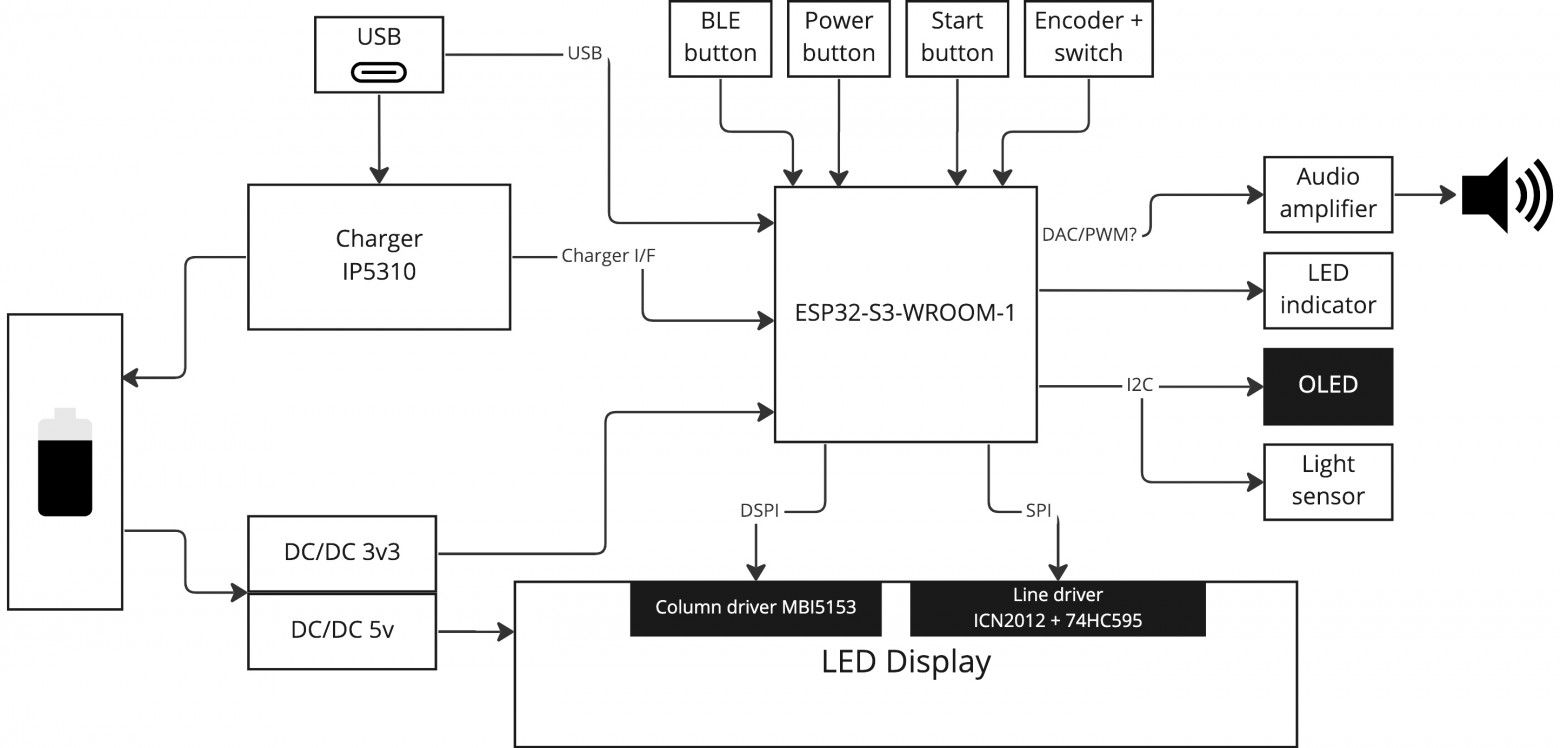
APIs & Integrations, Bluetooth LE & Wi-Fi
We want to make the status bar as versatile as possible so that it can be integrated into your projects, smart and non-smart home systems. The device will support Bluetooth Low Energy and Wi-Fi to display your notifications, exchange rates, server status, the number of TikTok subscribers, and so on. We want to make the most convenient open API, perhaps support protocols such as MQTT.
At the moment, the API is at the stage of high-level design. So we would like to know what you want to see in API and what types of connections would you use? For what would you use this status bar?
I invite you to join the project
We want to make a handy device that will help people every day. Now the project is at the design and development stage, and we invite everyone to participate in the discussion. What features will be helpful for you, and what would you like to see in the final device?